Configuring XML Paths
How to set paths for disk images.
This will not go through the installation process! It simply goes over pointing the Hard Disk image and Install Disk image path, to the correct fields. When stopping/starting the VM, double check the boot device chosen in the XML.
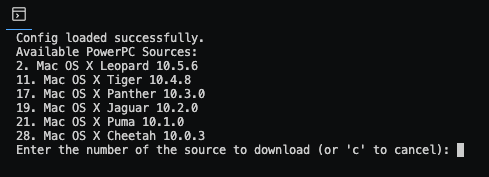
To begin, confirm you have downloaded the correct Install Disks for Jaguar.
You can now edit the XML paths to define your named Hard Disk image.
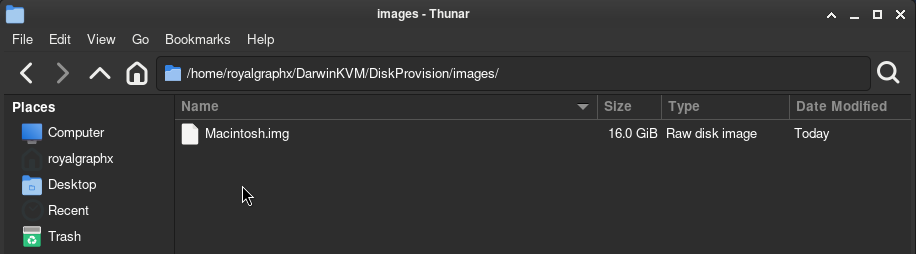
In this example image, you can see I named my image Macintosh.img, so you will update the path to reflect that.
<qemu:arg value='-drive'/>
<qemu:arg value='if=none,format=raw,media=disk,id=Macintosh,file=/home/user/DarwinKVM/DiskProvision/Macintosh.img,discard=unmap,detect-zeroes=unmap'/>
The example is spaced out for easier human readability for copy and pasting.
You can now modify and update the Install Disks path. Jaguar requires two CD-ROM Drives.
<qemu:arg value='-device'/>
<qemu:arg value='ide-cd,bus=ide.0,drive=Installer'/>
<qemu:arg value='-drive'/>
<qemu:arg value='if=none,format=raw,media=disk,id=Installer,file=/home/user/DarwinKVM/DarwinFetch/downloads/10.2.0_6C115/Apple Mac OS X 10.2 (10.2.6C115)/Disc1.iso,discard=unmap,detect-zeroes=unmap'/>

<qemu:arg value='-device'/>
<qemu:arg value='ide-cd,bus=ide.1,drive=Installer2'/>
<qemu:arg value='-drive'/>
<qemu:arg value='if=none,format=raw,media=disk,id=Installer2,file=/home/user/DarwinKVM/DarwinFetch/downloads/10.2.0_6C115/Apple Mac OS X 10.2 (10.2.6C115)/Disc2.iso,discard=unmap,detect-zeroes=unmap'/>
In this example, we point to the OS X 10.2 ISO Install Media disks from DarwinFetch.
This guide does not go over installation! You must change the following section to boot via CD-ROM or Hard Drive depending on what part of the installation process you are on.
<qemu:arg value='-boot'/>
<qemu:arg value='d'/>